How to Preserve Concert Tickets (Works for Receipts and Thermal Labels Too)
|
|
Time to read 5 min


|
|
Time to read 5 min
Attending a concert by your favourite star is an exciting and unforgettable experience, and many people want to keep a tangible reminder of that special moment. One of the most meaningful reminders is the concert ticket itself. Every time you see it, you are instantly transported back to the concert hall -- the roar of your own cheers, the singer’s passionate performance, and the atmosphere of the night come rushing back. However, concert tickets are usually made of paper, which makes them easy to crease, fold, lose or damage. So, is there a way to keep them safe and intact for years to come? Absolutely. Today, we’ll share several simple ways to help you preserve your concert tickets.
Table of Content
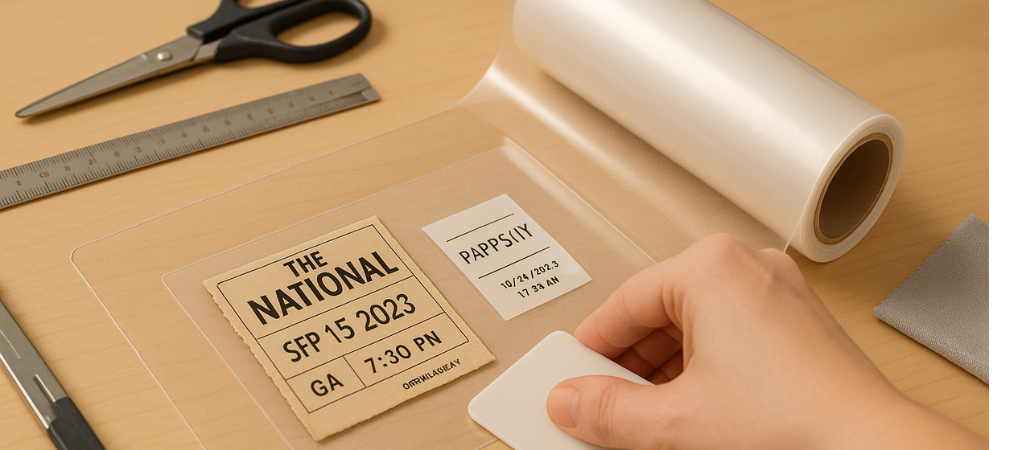
One of the most effective DIY ways to protect a concert ticket stub, receipt, or thermal labels is to seal it inside a rigid card film with cold lamination. This creates a strong barrier against, and dirt, helping the print stay legible for years.
Step 1 Choose the right card film
Select a 20-wire (0.2 mm) card film. This thickness is firm and durable, offering better long-term protect than thin sleeves.
Step 2 insert and position the ticket
Place the ticket inside the card film and lay it flat on a clean, smooth table. Make sure the ticket is centered and aligned.
Step 3 Cut the card film to size
If the card film is larger than your ticket, trim it down so it fit nicely while leaving a small margin around the edges.
Step 4 Apply the cold lamination film
Peel back the adhesive side of the cold lamination film and place it on top of the card film. Use a scraper or squeegee to press it down evenly, removing air bubbles as you go.
Step 5 seal the back side
Flip the card over and repeat the process with another piece of cold lamination film on the back. Smooth it out thoroughly.
Step 6 trim the excess edges
Carefully cut away any extra material, making sure the edges are neat and sealed. Your ticket is now ready for safe storage.
Why it works: Thermal paper will fade; a clean digital copy preserves the info and the memory.
What you need: A scanner or phone, a scanning app, good light, a flat surface.
How to do it
Scan at 300–600 dpi in color (even if the print looks black).
Use TIFF/PNG for archiving; JPEG is fine for sharing.
Flatten curled tickets under a clean glass sheet (or a book cover) while scanning to avoid shadows.
Crop, straighten, and save with a consistent file name like 2024-07-12_Taylor-Swift_LA_Ticket.png.
Pro tips
Back up in two places: cloud + external drive.
Add notes/keywords (venue, date, seat) so you can find it later.
For receipts, try OCR (text recognition) to make amounts searchable.
Avoid
Flash glare, heavy filters, and low-resolution photos that lose fine print.
Why it works: Light—especially UV—accelerates fading and yellowing on thermal paper.
What you need: Black, lightproof zip bags, an acid-free inner sleeve or envelope, small silica gel packs.
How to do it
Put the ticket in an acid-free, non-PVC sleeve first.
Slip that sleeve into a blackout zip bag, press out excess air, and seal.
Add a tiny silica gel pack to control moisture (don’t let it touch the paper directly).
Label the bag externally (year/artist/purpose) so you don’t keep opening it.
Pro tips
Replace or dry silica gel every 6–12 months.
Store the bags upright in a drawer or box away from windows.
Avoid
Clear PVC pages or vinyl pouches (plasticizers can react with thermal coatings).
Storing with rubber bands or near adhesives.
Why it works: Heat triggers the thermal coating; humidity warps paper and can cause sticking or smudging.
Targets (practical, not lab-grade): Cool, dry space, roughly 30–50% RH, away from direct heat.
How to do it
Keep tickets away from heaters, sunny sills, kitchens, bathrooms, and cars.
Choose a closet or drawer in your living area (not attic/garage/basement).
Use a small hygrometer to spot-check humidity; add silica gel if needed.
Keep items off the floor and away from exterior walls that swing in temperature.
Pro tips
If your climate is humid, consider a small dehumidifier for the room or cabinet.
Do a quick seasonal check (summer/winter) to adjust storage.
Avoid
Long-term storage in attics/basements/garages, and any spot that gets hot or damp.
Why it works: Inert, acid-free materials protect prints from chemical reactions and handling wear.
What to buy: Sleeves or album pages made of polyester (Mylar/PET), polypropylene, or polyethylene; acid-free, lignin-free paper inserts; non-PVC only.
How to do it
Pick sleeves that fit without bending—a little margin is good.
Slide tickets in gently; avoid tight fits that scuff the surface.
File sleeves in a rigid binder or ticket album, stored upright like books.
For mixed items (tickets + receipts + labels), use tab dividers by year/event/category.
Pro tips
Keep a “display copy” (photo print) in a frame and the original safely stored.
If framing originals, use UV-filtering glass/acrylic and a cool, shaded wall.
Avoid
“Magnetic” sticky albums, PVC pages, or anything with a strong plastic smell.
Metal paper clips, rubber bands, and pressure-sensitive mounts touching thermal paper.
Why it works: Adhesives and certain plastics can darken or lift the thermal image; residues migrate over time.
What to avoid: Tapes, glue sticks, mounting putty, PVC/vinyl, and unknown “soft” plastics.
How to do it safely
Don’t tape tickets directly—ever.
If you need to mount for display, use photo corners on the sleeve, not on the ticket.
Write notes/dates on a paper insert or on the sleeve edge, not on the ticket itself.
Interleave with acid-free paper if items share a pocket.
Pro tips
For shadowbox displays, keep the ticket in a clear archival sleeve inside the box.
If you must label, use pencil on an archival insert (ink can transfer under pressure).
Avoid
Pressing adhesive labels directly onto the ticket or receipt.
“Laminating” with heat; use cold methods only for thermal paper.
At the end of the day, a concert ticket s tub isn’t just paper—it’s a little snapshot of a memory. The same goes for an important receipt or a thermal shipping label you might need later. The problem is, thermal paper won’t stick around forever unless you give it some extra care. Whether you go all out with the card film + cold lamination method or just pop your ticket in a dark, safe spot, a little effort now can save you a lot of regret later. Years from now, you’ll be glad you can still hold that ticket in your hand and remember exactly where you were, what you saw, and how it felt.
About Betckey
Betckey Premium Labels is a leading supplier of compatible direct thermal labels, committed to high-quality and eco-friendly products as well as competitive pricing. We offer better products than manufactured original at 70% less price. Now, our Amazon store ranks first in the US, Canada, and Western Europe with thousands of positive ratings. Visit betckey.com and get special discount when purchasing! Sign up now and we'll send you a special discount towards your purchase. By the way, welcome to follow our official @ Tik Tok and @ Youtube accounts to get Betckey’s latest news!
If you want to buy thermal labels or sticker paper, you can check out more on our store